
AZ-100 Exam Questions - Online Test
AZ-100 Premium VCE File

150 Lectures, 20 Hours
We offers AZ-100 Exam Questions and Answers. "Microsoft Azure Infrastructure and Deployment", also known as AZ-100 exam, is a Microsoft Certification. This set of posts, Passing the AZ-100 exam with AZ-100 Dumps Questions, will help you answer those questions. The AZ-100 Exam Questions covers all the knowledge points of the real exam. 100% real AZ-100 Free Practice Questions and revised by experts!
Also have AZ-100 free dumps questions for you:
NEW QUESTION 1
Click to expand each objective. To connect to the Azure portal, type https://portal.azure.com in the browser
address bar.


When you are finished performing all the tasks, click the ‘Next’ button.
Note that you cannot return to the lab once you click the ‘Next’ button. Scoring occur in the background while you complete the rest of the exam.
Overview
The following section of the exam is a lab. In this section, you will perform a set of tasks in a live environment. While most functionality will be available to you as it would be in a live environment, some functionality (e.g., copy and paste, ability to navigate to external websites) will not be possible by design. Scoring is based on the outcome of performing the tasks stated in the lab. In other words, it doesn’t matter how you accomplish the task, if you successfully perform it, you will earn credit for that task.
Labs are not timed separately, and this exam may have more than one lab that you must complete. You can use as much time as you would like to complete each lab. But, you should manage your time appropriately to ensure that you are able to complete the lab(s) and all other sections of the exam in the time provided.
Please note that once you submit your work by clicking the Next button within a lab, you will NOT be able to return to the lab.
To start the lab
You may start the lab by clicking the Next button.
You plan to move backup files and documents from an on-premises Windows file server to Azure Storage. The backup files will be stored as blobs.
You need to create a storage account named corpdata7523690n2. The solution must meet the following requirements: Ensure that the documents are accessible via drive mappings from Azure virtual machines that run Windows Server 2021. Provide the highest possible redundancy for the documents. Minimize storage access costs.
What should you do from the Azure portal?
Answer:
Explanation: Step 1: In the Azure portal, click All services. In the list of resources, type Storage Accounts. As you begin typing, the list filters based on your input. Select Storage Accounts.
Step 2: On the Storage Accounts window that appears, choose Add. Step 3: Select the subscription in which to create the storage account.
Step 4: Under the Resource group field, select Create New. Create a new Resource
Step 5: Enter a name for your storage account: corpdata7523690n2
Step 6: For Account kind select: General-purpose v2 accounts (recommended for most scenarios)
General-purpose v2 accounts is recommended for most scenarios. . General-purpose v2 accounts deliver the lowest per-gigabyte capacity prices for Azure Storage, as well as industry-competitive transaction prices.
Step 7: For replication select: Read-access geo-redundant storage (RA-GRS)
Read-access geo-redundant storage (RA-GRS) maximizes availability for your storage account. RA-GRS provides read-only access to the data in the secondary location, in addition to geo-replication across two regions.
References:
https://docs.microsoft.com/en-us/azure/storage/common/storage-quickstart-create-account https://docs.microsoft.com/en-us/azure/storage/common/storage-account-overview
NEW QUESTION 2
Overview
The following section of the exam is a lab. In this section, you will perform a set of tasks in a live environment. While most functionality will be available to you as it would be in a live environment, some functionality (e.g., copy and paste, ability to navigate to external websites) will not be possible by design.
Scoring is based on the outcome of performing the tasks stated in the lab. In other words, it doesn’t matter how you accomplish the task, if you successfully perform it, you will earn credit for that task.
Labs are not timed separately, and this exam may have more than one lab that you must complete. You can use as much time as you would like to complete each lab. But, you should manage your time appropriately to ensure that you are able to complete the lab(s) and all other sections of the exam in the time provided.
Please note that once you submit your work by clicking the Next button within a lab, you will NOT be able to return to the lab.
To start the lab
You may start the lab by clicking the Next button. You plan to host several secured websites on Web01.
You need to allow HTTPS over TCP port 443 to Web01 and to prevent HTTP over TCP port 80 to Web01. What should you do from the Azure portal?
Answer:
Explanation: You can filter network traffic to and from Azure resources in an Azure virtual network with a network security group. A network security group contains security rules that allow or deny inbound network traffic to, or outbound network traffic from, several types of Azure resources.
A network security group contains security rules that allow or deny inbound network traffic to, or outbound network traffic from, several types of Azure resources.
Step A: Create a network security group
A1. Search for and select the resource group for the VM, choose Add, then search for and select Network security group.
A2. Select Create.
The Create network security group window opens. A3. Create a network security group
Enter a name for your network security group.
Select or create a resource group, then select a location. A4. Select Create to create the network security group.
Step B: Create an inbound security rule to allows HTTPS over TCP port 443 B1. Select your new network security group.
B2. Select Inbound security rules, then select Add. B3. Add inbound rule
B4. Select Advanced.
From the drop-down menu, select HTTPS.
You can also verify by clicking Custom and selecting TCP port, and 443. B5. Select Add to create the rule.
Repeat step B2-B5 to deny TCP port 80
B6. Select Inbound security rules, then select Add. B7. Add inbound rule
B8. Select Advanced.
Clicking Custom and selecting TCP port, and 80. B9. Select Deny.
Step C: Associate your network security group with a subnet
Your final step is to associate your network security group with a subnet or a specific network interface. C1. In the Search resources, services, and docs box at the top of the portal, begin typing Web01. When the
Web01 VM appears in the search results, select it.
C2. Under SETTINGS, select Networking. Select Configure the application security groups, select the Security Group you created in Step A, and then select Save, as shown in the following picture:
References:
https://docs.microsoft.com/en-us/azure/virtual-network/tutorial-filter-network-traffic
NEW QUESTION 3
Note: This question is part of a series of questions that present the same scenario. Each question in the series contains a unique solution that might meet the stated goals. Some question sets might have more than one correct solution, while others might not have a correct solution.
After you answer a question in this section, you will NOT be able to return to it. As a result, these questions will not appear in the review screen.
You have an Azure subscription that contains 10 virtual networks. The virtual networks are hosted in separate resource groups.
Another administrator plans to create several network security groups (NSGs) in the subscription.
You need to ensure that when an NSG is created, it automatically blocks TCP port 8080 between the virtual networks.
Solution: You assign a built-in policy definition to the subscription. Does this meet the goal?
- A. Yes
- B. No
Answer: B
NEW QUESTION 4
Overview
The following section of the exam is a lab. In this section, you will perform a set of tasks in a live environment. While most functionality will be available to you as it would be in a live environment, some functionality (e.g., copy and paste, ability to navigate to external websites) will not be possible by design.
Scoring is based on the outcome of performing the tasks stated in the lab. In other words, it doesn’t matter how you accomplish the task, if you successfully perform it, you will earn credit for that task.
Labs are not timed separately, and this exam may have more than one lab that you must complete. You can use as much time as you would like to complete each lab. But, you should manage your time appropriately to ensure that you are able to complete the lab(s) and all other sections of the exam in the time provided.
Please note that once you submit your work by clicking the Next button within a lab, you will NOT be able to return to the lab.
To start the lab
You may start the lab by clicking the Next button.
Your company plans to host in Azure the source files of several line-of-business applications.
You need to create an Azure file share named corpsoftware in the storagelod8095859 storage account. The solution must ensure the corpsoftware can store only up to 250 GB of data.
What should you do from the Azure portal?
Answer:
Explanation: Step 1. Go to the Storage Account blade on the Azure portal:
Step 2. Click on add File Share button:
Step 3. Provide Name (storagelod8095859) and Quota (250 GB).
References:
https://docs.microsoft.com/en-us/azure/storage/files/storage-how-to-create-file-share
NEW QUESTION 5
Click to expand each objective. To connect to the Azure portal, type https://portal.azure.com in the browser address bar.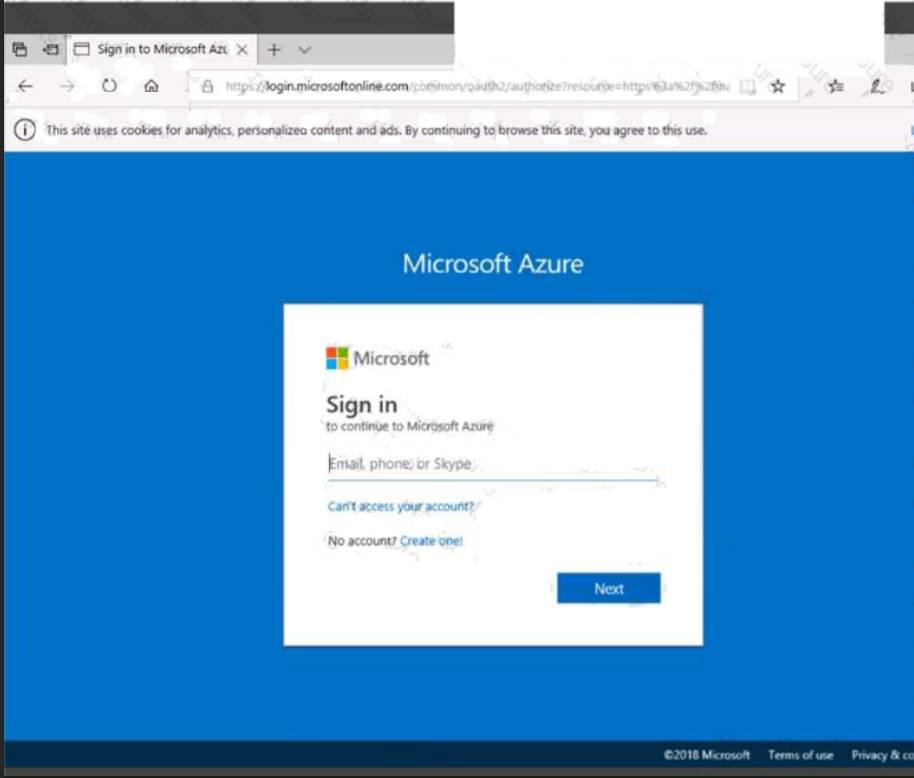


When you are finished performing all the tasks, click the ‘Next’ button.
Note that you cannot return to the lab once you click the ‘Next’ button. Scoring occur in the background while you complete the rest of the exam.
Overview
The following section of the exam is a lab. In this section, you will perform a set of tasks in a live environment. While most functionality will be available to you as it would be in a live environment, some functionality (e.g., copy and paste, ability to navigate to external websites) will not be possible by design. Scoring is based on the outcome of performing the tasks stated in the lab. In other words, it doesn’t matter how you accomplish the task, if you successfully perform it, you will earn credit for that task.
Labs are not timed separately, and this exam may have more than one lab that you must complete. You can use as much time as you would like to complete each lab. But, you should manage your time appropriately to ensure that you are able to complete the lab(s) and all other sections of the exam in the time provided.
Please note that once you submit your work by clicking the Next button within a lab, you will NOT be able to return to the lab.
To start the lab
You may start the lab by clicking the Next button.
You plan to create 100 Azure virtual machines on each of the following three virtual networks:  VNET1005a VNET1005b VNET1005c
All the network traffic between the three virtual networks will be routed through VNET1005a.
You need to create the virtual networks, and then to ensure that all the Azure virtual machines can connect to other virtual machines by using their private IP address. The solution must NOT require any virtual network gateways and must minimize costs.
What should you do from the Azure portal before you configure IP routing?
Answer:
Explanation: Step 1: Click Create a resource in the portal.
Step 2: Enter Virtual network in the Search the Marketplace box at the top of the New pane that appears. Click Virtual network when it appears in the search results.
Step 3: Select Classic in the Select a deployment model box in the Virtual Network pane that appears, then click Create.
Step 4: Enter the following values on the Create virtual network (classic) pane and then click Create: Name: VNET1005a
Address space: 10.0.0.0/16 Subnet name: subnet0 Resource group: Create new
Subnet address range: 10.0.0.0/24
Subscription and location: Select your subscription and location.
Step 5: Repeat steps 3-5 for VNET1005b (10.1.0.0/16, 10.1.0.0/24), and for VNET1005c 10.2.0.0/16, 10.2.0.0/24).
References: https://docs.microsoft.com/en-us/azure/virtual-network/create-virtual-network-classic
NEW QUESTION 6
Overview
The following section of the exam is a lab. In this section, you will perform a set of tasks in a live environment. While most functionality will be available to you as it would be in a live environment, some functionality (e.g., copy and paste, ability to navigate to external websites) will not be possible by design.
Scoring is based on the outcome of performing the tasks stated in the lab. In other words, it doesn’t matter how you accomplish the task, if you successfully perform it, you will earn credit for that task.
Labs are not timed separately, and this exam may have more than one lab that you must complete. You can use as much time as you would like to complete each lab. But, you should manage your time appropriately to ensure that you are able to complete the lab(s) and all other sections of the exam in the time provided.
Please note that once you submit your work by clicking the Next button within a lab, you will NOT be able to return to the lab.
To start the lab
You may start the lab by clicking the Next button.
You plan to prevent users from accidentally deleting blob data from Azure.
You need to ensure that administrators can recover any blob data that is deleted accidentally from the storagelod8095859 storage account for 14 days after the deletion occurred.
What should you do from the Azure portal?
Answer:
Explanation: Task A: Create a Recovery Services vault (if a vault already exists skip this task, go to Task B below) A1. From Azure Portal, On the Hub menu, click All services and in the list of resources, type Recovery
Services and click Recovery Services vaults.
If there are recovery services vaults in the subscription, the vaults are listed. A2. On the Recovery Services vaults menu, click Add.
A3. The Recovery Services vault blade opens, prompting you to provide a Name, Subscription, Resource group, and Location
Task B. Create a backup goal
B1. On the Recovery Services vault blade (for the vault you just created), in the Getting Started section, click Backup, then on the Getting Started with Backup blade, select Backup goal.
The Backup Goal blade opens. If the Recovery Services vault has been previously configured, then the Backup Goal blades opens when you click Backup on the Recovery Services vault blade.
B2. From the Where is your workload running? drop-down menu, select Azure.
B3. From the What do you want to backup? menu, select Blob Storage, and click OK. B4. Finish the Wizard.
Task C. create a backup schedule
C1. Open the Microsoft Azure Backup agent. You can find it by searching your machine for Microsoft Azure Backup.
C2. In the Backup agent's Actions pane, click Schedule Backup to launch the Schedule Backup Wizard.
C3. On the Getting started page of the Schedule Backup Wizard, click Next. C4. On the Select Items to Backup page, click Add Items.
The Select Items dialog opens.
C5. Select Blob Storage you want to protect, and then click OK. C6.In the Select Items to Backup page, click Next.
On the Specify Backup Schedule page, specify Schedule a backup every day, and click Next.
C7. On the Select Retention Policy page, set it to 14 days, and click Next.
C8. Finish the Wizard. References:
https://docs.microsoft.com/en-us/azure/backup/backup-configure-vault
NEW QUESTION 7
You have an Azure subscription named Subscription1 that is used be several departments at your company. Subscription1 contains the resources in the following table:
Another administrator deploys a virtual machine named VM1 and an Azure Storage account named Storage2 by using a single Azure Resource Manager template.
You need to view the template used for the deployment.
From which blade can you view the template that was used for the deployment?
- A. RG1
- B. VM1
- C. Storage1
- D. Container1
Answer: A
Explanation: 1. View template from deployment history
Go to the resource group for your new resource group. Notice that the portal shows the result of the last
deployment. Select this link.
2. You see a history of deployments for the group. In your case, the portal probably lists only one deployment. Select this deployment.
The portal displays a summary of the deployment. The summary includes the status of the deployment and its operations and the values that you provided for parameters. To see the template that you used for the deployment, select View template.
References:
https://docs.microsoft.com/en-us/azure/azure-resource-manager/resource-manager-export-template
NEW QUESTION 8
You have an Azure subscription that contains the resources in the following table.
VM1 and VM2 are deployed from the same template and host line-of-business applications accessed by using Remote Desktop. You configure the network security group (NSG) shown in the exhibit. (Click the Exhibit button.)
You need to prevent users of VM1 and VM2 from accessing websites on the Internet.
What should you do?
- A. Associate the NSG to Subnet1.
- B. Disassociate the NSG from a network interface.
- C. Change the DenyWebSites outbound security rule.
- D. Change the Port_80 inbound security rule.
Answer: A
Explanation: You can associate or dissociate a network security group from a network interface or subnet.
The NSG has the appropriate rule to block users from accessing the Internet. We just need to associate it with Subnet1.
References: https://docs.microsoft.com/en-us/azure/virtual-network/manage-network-security-group
NEW QUESTION 9
You have an Azure subscription named Subscription1.
You create an Azure Storage account named contosostorage, and then you create a file share named data. Which UNC path should you include in a script that references files from the data file share? To answer, drag the appropriate values to the correct targets. Each value may be used once, more than once, or not at all. You may need to drag the split bar between panes or scroll to view content.
NOTE: Each correct selection is worth one point.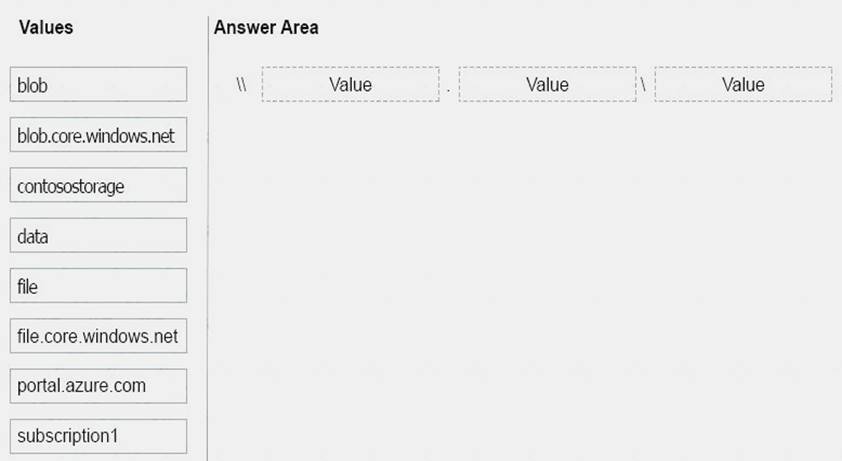
Answer:
Explanation: Box 1: contosostorage The name of account
Box 2: file.core.windows.net
Box 3: data
The name of the file share is data. Example:
References: https://docs.microsoft.com/en-us/azure/storage/files/storage-how-to-use-files-windows
NEW QUESTION 10
You have an on-premises file server named Server1 that runs Windows Server 2021. You have an Azure subscription that contains an Azure file share.
You deploy an Azure File Sync Storage Sync Service, and you create a sync group. You need to synchronize files from Server1 to Azure.
Which three actions should you perform in sequence? To answer, move the appropriate actions from the list of actions to the answer area and arrange them in the correct order.
Answer:
Explanation: Step 1: Install the Azure File Sync agent on Server1
The Azure File Sync agent is a downloadable package that enables Windows Server to be synced with an Azure file share
Step 2: Register Server1.
Register Windows Server with Storage Sync Service
Registering your Windows Server with a Storage Sync Service establishes a trust relationship between your server (or cluster) and the Storage Sync Service.
Step 3: Add a server endpoint
Create a sync group and a cloud endpoint.
A sync group defines the sync topology for a set of files. Endpoints within a sync group are kept in sync with each other. A sync group must contain one cloud endpoint, which represents an Azure file share and one or more server endpoints. A server endpoint represents a path on registered server.
References: https://docs.microsoft.com/en-us/azure/storage/files/storage-sync-files-deployment-guide
NEW QUESTION 11
Note: This question is part of a series of questions that present the same scenario. Each question in the series contains a unique solution that might meet the stated goals. Some question sets might have more than one correct solution, while others might not have a correct solution.
After you answer a question in this section, you will NOT be able to return to it. As a result, these questions will not appear in the review screen.
You have an Azure virtual machine named VM1. VM1 was deployed by using a custom Azure Resource Manager template named ARM1.json.
You receive a notification that VM1 will be affected by maintenance. You need to move VM1 to a different host immediately.
Solution: From the Redeploy blade, you click Redeploy. Does this meet the goal?
- A. Yes
- B. No
Answer: A
Explanation: When you redeploy a VM, it moves the VM to a new node within the Azure infrastructure and then powers it back on, retaining all your configuration options and associated resources.
References: https://docs.microsoft.com/en-us/azure/virtual-machines/windows/redeploy-to-new-node
NEW QUESTION 12
You have a Recovery Service vault that you use to test backups. The test backups contain two protected virtual machines.
You need to delete the Recovery Services vault. What should you do first?
- A. From the Recovery Service vault, stop the backup of each backup item.
- B. From the Recovery Service vault, delete the backup data.
- C. Modify the disaster recovery properties of each virtual machine.
- D. Modify the locks of each virtual machine.
Answer: A
Explanation: You can't delete a Recovery Services vault if it is registered to a server and holds backup data. If you try to delete a vault, but can't, the vault is still configured to receive backup data.
Remove vault dependencies and delete vault
In the vault dashboard menu, scroll down to the Protected Items section, and click Backup Items. In this menu, you can stop and delete Azure File Servers, SQL Servers in Azure VM, and Azure virtual machines.
References: https://docs.microsoft.com/en-us/azure/backup/backup-azure-delete-vault
NEW QUESTION 13
Which blade should you instruct the finance department auditors to use?
- A. Partner information
- B. Overview
- C. Payment methods
- D. Invoices
Answer: D
Explanation: You can opt in and configure additional recipients to receive your Azure invoice in an email. This feature may not be available for certain subscriptions such as support offers, Enterprise Agreements, or Azure in Open.
Select your subscription from the Subscriptions page. Opt-in for each subscription you own. Click Invoices then Email my invoice.
Click Opt in and accept the terms.
Scenario: During the testing phase, auditors in the finance department must be able to review all Azure costs from the past week.
References: https://docs.microsoft.com/en-us/azure/billing/billing-download-azure-invoice-daily-usage-date
NEW QUESTION 14
You are evaluating the connectivity between the virtual machines after the planned implementation of the Azure networking infrastructure.
For each of the following statements, select Yes if the statement is true. Otherwise, select No.
Answer:
Explanation: Once the VNets are peered, all resources on one VNet can communicate with resources on the other peered VNets. You plan to enable peering between Paris-VNet and AllOffices-VNet. Therefore VMs on Subnet1, which is on Paris-VNet and VMs on Subnet3, which is on AllOffices-VNet will be able to connect to each other.
All Azure resources connected to a VNet have outbound connectivity to the Internet by default. Therefore VMs on ClientSubnet, which is on ClientResources-VNet will have access to the Internet; and VMs on Subnet3 and Subnet4, which are on AllOffices-VNet will have access to the Internet.
References:
https://docs.microsoft.com/en-us/azure/virtual-network/virtual-network-peering-overview https://docs.microsoft.com/en-us/azure/networking/networking-overview#internet-connectivity
NEW QUESTION 15
You have two Azure virtual machines named VM1 and VM2. VM1 has a single data disk named Disk1. You need to attach Disk1 to VM2. The solution must minimize downtime for both virtual machines.
Which four actions should you perform in sequence? To answer, move the appropriate actions from the list of actions to the answer area and arrange them in the correct order.
Answer:
Explanation: Step 1: Stop VM1.
Step 2: Detach Disk1 from VM1. Step 3: Start VM1.
Detach a data disk using the portal In the left menu, select Virtual Machines.
 In the virtual machine pane, select Disks. At the top of the Disks pane, select Edit. In the Disks pane, to the far right of the data disk that you would like to detach, click the Detach button image detach button. After the disk has been removed, click Save on the top of the pane. In the virtual machine pane, click Overview and then click the Start button at the top of the pane to restart the VM. The disk stays in storage but is no longer attached to a virtual machine. Step 4: Attach Disk1 to VM2
Attach an existing disk
Follow these steps to reattach an existing available data disk to a running VM. Select a running VM for which you want to reattach a data disk. From the menu on the left, select Disks. Select Attach existing to attach an available data disk to the VM. From the Attach existing disk pane, select OK.
References:
https://docs.microsoft.com/en-us/azure/virtual-machines/windows/detach-disk https://docs.microsoft.com/en-us/azure/lab-services/devtest-lab-attach-detach-data-disk
NEW QUESTION 16
You have an Azure subscription named Subscription1. Subscription1 contains the resources in the following table.
VNet1 is in RG1. VNet2 is in RG2. There is no connectivity between VNet1 and Vnet2.
An administrator named Admin1 creates an Azure virtual machine named VM1 in RG1. VM1 uses a disk named Disk1 and connects to VNet1. Admin1 then installs a custom application in VM1.
You need to move the custom application to Vnet2. The solution must minimize administrative effort. Which two actions should you perform? To answer, select the appropriate options in the answer area. NOTE: Each correct selection is worth one point.
Answer:
Explanation: You can move a VM and its associated resources to another resource group using the portal. References: https://docs.microsoft.com/en-us/azure/virtual-machines/windows/move-vm
NEW QUESTION 17
You plan to back up an Azure virtual machine named VM1.
You discover that the Backup Pre-Check status displays a status of Warning. What is a possible cause of the Warning status?
- A. VM1 does not have the latest version of WaAppAgent.exe installed.
- B. VM1 has an unmanaged disk.
- C. VM1 is stopped.
- D. A Recovery Services vault is unavailable.
Answer: A
Explanation: The Warning state indicates one or more issues in VM’s configuration that might lead to backup failures and provides recommended steps to ensure successful backups. Not having the latest VM Agent installed, for example, can cause backups to fail intermittently and falls in this class of issues.
References:
https://azure.microsoft.com/en-us/blog/azure-vm-backup-pre-checks/
NEW QUESTION 18
You have an Azure subscription named Subscription1.
You plan to deploy an Ubuntu Server virtual machine named VM1 to Subscription1.
You need to perform a custom deployment of the virtual machine. A specific trusted root certification authority (CA) must be added during the deployment.
What should you do? To answer, select the appropriate options in the answer area. NOTE: Each correct selection is worth one point.
Answer:
Explanation: Box 1: Unattend.xml
In preparation to deploy shielded VMs, you may need to create an operating system specialization answer file. On Windows, this is commonly known as the "unattend.xml" file. The New-ShieldingDataAnswerFile Windows PowerShell function helps you do this. Starting with Windows Server version 1709, you can run certain Linux guest OSes in shielded VMs. If you are using the System Center Virtual Machine Manager Linux agent to specialize those VMs, the New-ShieldingDataAnswerFile cmdlet can create compatible answer files for it.
Box 2: The Azure Portal
You can use the Azure portal to deploy a Linux virtual machine (VM) in Azure that runs Ubuntu.
References: https://docs.microsoft.com/en-us/azure/virtual-machines/linux/quick-create-portal
NEW QUESTION 19
You are planning the move of App1 to Azure. You create a network security group (NSG).
You need to recommend a solution to provide users with access to App1. What should you recommend?
- A. Create an outgoing security rule for port 443 from the Interne
- B. Associate the NSG to all the subnets.
- C. Create an incoming security rule for port 443 from the Interne
- D. Associate the NSG to all the subnets.
- E. Create an incoming security rule for port 443 from the Interne
- F. Associate the NSG to the subnet that contains the web servers.
- G. Create an outgoing security rule for port 443 from the Interne
- H. Associate the NSG to the subnet thatcontains the web servers.
Answer: C
Explanation: As App1 is public-facing we need an incoming security rule, related to the access of the web servers. Scenario: You have a public-facing application named App1. App1 is comprised of the following three tiers: a SQL database, a web front end, and a processing middle tier.
Each tier is comprised of five virtual machines. Users access the web front end by using HTTPS only.
NEW QUESTION 20
Overview
The following section of the exam is a lab. In this section, you will perform a set of tasks in a live environment. While most functionality will be available to you as it would be in a live environment, some functionality (e.g., copy and paste, ability to navigate to external websites) will not be possible by design.
Scoring is based on the outcome of performing the tasks stated in the lab. In other words, it doesn’t matter how you accomplish the task, if you successfully perform it, you will earn credit for that task.
Labs are not timed separately, and this exam may have more than one lab that you must complete. You can use as much time as you would like to complete each lab. But, you should manage your time appropriately to ensure that you are able to complete the lab(s) and all other sections of the exam in the time provided.
Please note that once you submit your work by clicking the Next button within a lab, you will NOT be able to return to the lab.
To start the lab
You may start the lab by clicking the Next button.
You plan to back up all the Azure virtual machines in your Azure subscription at 02:00 Coordinated Universal Time (UTC) daily.
You need to prepare the Azure environment to ensure that any new virtual machines can be configured quickly for backup. The solution must ensure that all the daily backups performed at 02:00 UTC are stored for only 90 days.
What should you do from the Azure portal?
Answer:
Explanation: Task A: Create a Recovery Services vault (if a vault already exists skip this task, go to Task B below) A1. From Azure Portal, On the Hub menu, click All services and in the list of resources, type Recovery
Services and click Recovery Services vaults.
If there are recovery services vaults in the subscription, the vaults are listed. A2. On the Recovery Services vaults menu, click Add.
A3. The Recovery Services vault blade opens, prompting you to provide a Name, Subscription, Resource group, and Location
Task B.
B1. On the Recovery Services vault blade (for the vault you just created), in the Getting Started section, click Backup, then on the Getting Started with Backup blade, select Backup goal.
The Backup Goal blade opens. If the Recovery Services vault has been previously configured, then the Backup Goal blades opens when you click Backup on the Recovery Services vault blade.
B2. From the Where is your workload running? drop-down menu, select Azure.
B3. From the What do you want to backup? menu, select Virtual Machine, and click OK.
B4. Finish the Wizard.
Task C. create a backup schedule
C1. Open the Microsoft Azure Backup agent. You can find it by searching your machine for Microsoft Azure Backup.
C2. In the Backup agent's Actions pane, click Schedule Backup to launch the Schedule Backup Wizard.
C3. On the Getting started page of the Schedule Backup Wizard, click Next. C4. On the Select Items to Backup page, click Add Items.
The Select Items dialog opens.
C5. Select Blob Storage you want to protect, and then click OK. C6.In the Select Items to Backup page, click Next.
On the Specify Backup Schedule page, specify Schedule a backup every: day
At the following times: 2.00 AM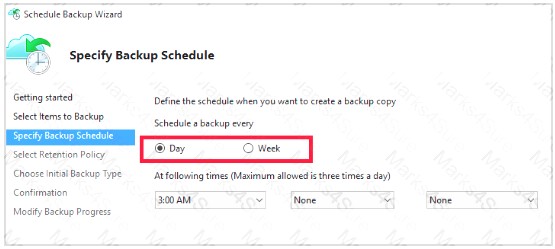
C7. On the Select Retention Policy page, set it to 90 days, and click Next.
C8. Finish the Wizard. References:
https://docs.microsoft.com/en-us/azure/backup/backup-configure-vault
Recommend!! Get the Full AZ-100 dumps in VCE and PDF From 2passeasy, Welcome to Download: https://www.2passeasy.com/dumps/AZ-100/ (New 106 Q&As Version)
- Certified AZ-102 Braindumps 2021
- The Down To Date Guide To 98-361 Study Guide
- The Updated Guide To 70-535 exam
- Free 70-695 Exam Questions 2021
- Updated MS-201 Testing Material 2021
- Update DA-100 Testing Bible For Analyzing Data With Microsoft Power BI Certification
- The Secret Of Microsoft MB-901 Latest Exam
- Approved 70-778 Torrent 2021
- Microsoft AZ-202 Exam Dumps 2021
- What Free 70-346 exam Is?